Product introduction
Anagram is a multi-effect processor and pedalboard platform designed for bass players who need flexibility, speed, and precision. It runs a modern DSP architecture with six cores, capable of handling complex effect chains and amp modeling with low latency.
At its core is a powerful operating system that manages real-time audio processing and hosts DSP blocks. These include a curated selection of effects tailored for bass, as well as support for NAM and AIDA-X neural models and cabinet impulse responses.
The 7″ high-brightness touchscreen, six high resolution endless rotary knobs, and three footswitches provide a streamlined and responsive workflow for both live and studio use.
Anagram’s architecture is designed to evolve. Over time, it will offer new features, additional DSP blocks, and support for third-party content. Its connectivity includes stereo and XLR outputs, MIDI, USB audio, send/return loop, and expression input, making it adaptable to a wide range of setups.
Overview and connections
Top View

- Six endless rotary push knobs
- 7” touchscreen display
- Three footswitches
Rear View
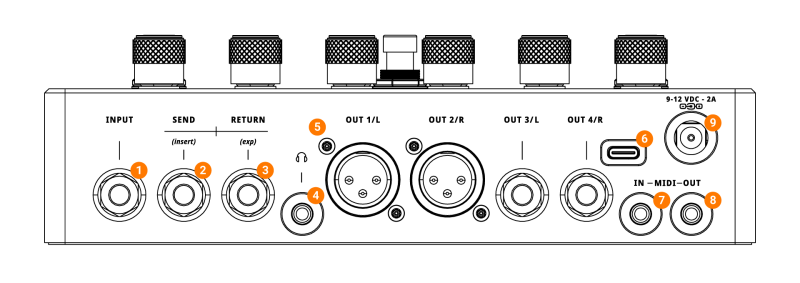
- Input: ¼” instrument input
- Send (insert): A dual function ¼” jack supporting either a stereo send or a mono insert for creating an effects loop.
- Return (exp): A dual function ¼” jack supporting either a stereo return or an expression pedal input.
- Headphones: The 3.5mm stereo headphone
- Two ¼” outputs and two XLR outputs.
- USB-C port
- MIDI In: A 3.5mm TRS (Type A) j
- MIDI Out: A 3.5mm TRS (Type A)
- 9V DC: Power Input 9V DC, 2 A.
Usage / Operation
General operation
Anagram operates around the concept of presets. A preset is a saved configuration that contains the full signal chain, all block settings, footswitch assignments, scenes, bindings, and any additional parameters. Presets can be recalled instantly, making it easy to switch between different setups during rehearsal, recording, or performance.
The interface is structured into views and modes, which define how you interact with the presets:
- Views determine what part of the preset you’re looking at—whether it’s the signal chain, parameter bindings, or just the preset’s name.
- Modes define what the footswitches do—whether they navigate presets, toggle individual blocks, or switch between scenes.
Touchscreen Interactions
- The Anagram touchscreen supports a range of intuitive gestures to streamline navigation and editing.
- Tap to open blocks, menus, or parameters:
- Swipe left/right or up/down to scroll through the canvas or access secondary pages in multi-page screens.
- Drag and drop is used for reordering blocks, bindings, scenes, or presets.
- Long press activates multi-selection or opens contextual actions where available.
- Tapping the + icon allows you to add new elements such as blocks or bindings.
- These interactions are consistent across views, ensuring a smooth and efficient workflow.
Core Concepts
Preset
A preset is a complete sound configuration. It contains the signal chain, block settings, scenes, bindings, footswitch assignments, and global parameters relevant to that setup. Presets can be created from scratch, edited, renamed, and saved.
DSP Block
A DSP block is a modular audio processing unit used to build the signal chain. Each block performs a specific function—such as amp modeling, cabinet simulation, compression, modulation, or utility tasks like splitting or merging signals. Blocks can be rearranged, parameterized, or removed, and new blocks are periodically added through firmware updates.
Bank
A bank is a group of three presets. Anagram organizes presets into banks to make navigation with footswitches fast and predictable. You can store up to 42 banks, giving you access to 126 presets in total. Navigation between banks can be done using footswitch combinations or within the Preset Manager.
Binding
A binding is a connection between a physical control (knob or footswitch) and one or more parameters inside the preset. Bindings let you control effect parameters in real time, either through the six rotary knobs or footswitch actions. You can bind multiple parameters to a single control.
Quickpot
The term quickpot refers to the automatic mapping between the six rotary knobs and the block directly below them in the Chain View. When you scroll through blocks, the quickpots follow, allowing immediate hands-on control without additional setup.
Scene
A scene is a variation within a preset. It allows you to instantly recall changes in block states and parameters without switching to another preset. This makes it possible to create dynamic transitions—for example, turning multiple blocks on/off or adjusting gain levels with a single footswitch press. Each preset can hold up to three scenes.
Asset
An asset is any user-loaded file that can be used inside a block. This includes NAM or AIDA-X models, cabinet IRs, and in the future, other types of content. Assets are added to the device using the Suite App and used by the Loader blocks.
Areas (User, Factory)
Anagram organizes content into two areas:
- User area: Where all user-created or modified presets, scenes, assets, and settings are saved.
- Factory area: Contains default presets and content provided by Darkglass. These can be browsed and copied into the user area for editing but cannot be overwritten directly.
Modes and Views
You can move between views and cycle through modes using the double button in the upper-right corner of the screen. Additionally, you can cycle through the modes by long-pressing Footswitch C.
Each combination of view and mode is designed to offer a focused workflow, whether you’re building sounds, performing live, or adjusting parameters on the fly.
Input and output level meters are located at the left and right edges of the display, and are available in all Views and Modes.
Preset mode
Preset Mode exists to let users switch between full preset configurations using only the footswitches. This is the primary mode for live performance or rehearsal when quick, hands-free changes are needed.
What do the footswitches do in this mode
- Pressing Footswitch A, B, or C loads Preset A, B, or C within the current bank.
- Pressing A + B simultaneously opens a screen showing the presets in the previous bank.
- Pressing B + C simultaneously opens a screen showing the presets in the next bank.
This mode is ideal when each preset represents a complete sound or rig, and you need to switch between them instantly with minimal distraction.
Stomp mode
Stomp Mode is designed to give users a flexible, stompbox-like experience. It allows you to assign specific parameters or block states to footswitches, making it easy to toggle effects or trigger actions while playing—without switching presets.
This mode is ideal for users who want to build versatile presets and control them dynamically with their feet.
What do the footswitches do in this mode
- Pressing Footswitch A, B, or C toggles the state of the corresponding foot binding A, B, or C.
- Pressing A + B simultaneously loads the previous preset.
- Pressing B + C simultaneously loads the next preset.
Scene mode
Scene Mode is designed to let users switch between scenes using the footswitches. Scenes allow you to make multiple simultaneous changes to a preset—such as toggling blocks or adjusting parameter values—without needing to load a new preset. This enables seamless transitions during performance while keeping your signal path consistent.
What do the footswitches do in this mode
- Pressing Footswitch A, B, or C loads Scene A, B, or C within the current preset.
- Pressing A + B simultaneously loads the previous preset.
- Pressing B + C simultaneously loads the next preset.
Scene Mode allows you to set up and recall scenes. When Scene Mode is active, an additional button appears in the top bar. This button lets you switch between two editing modes:
- Controlling Active Scene
- Controlling All Scenes
Before any scene-specific edits are made, all parameters are synchronized across all scenes. Changing a parameter in this state affects all scenes equally.
- When Controlling Active Scene is selected:
Parameter changes apply only to the currently active scene. This causes the parameter to become part of the scene data, meaning its value can differ between scenes. - When Controlling All Scenes is selected:
Parameter changes apply to all scenes at once. This removes the parameter from scene-specific control, keeping it uniform across the preset.
You can change the active scene using the footswitches even while inside the Block Settings screen. This allows fine-tuning of scene-specific values while adjusting block parameters.
Chain view
The Chain View shows the signal chain as a horizontal arrangement of blocks, representing the order of audio processing flowing from left to right. The interface supports two rows, allowing up to 24 blocks per preset. This view is optimized for fast editing and real-time interaction, with visual clarity and direct access to key controls.
The Chain View is designed to provide a clear and intuitive overview of your FX chain structure. It allows users to understand and manage the routing and sequence of their effects in real time. Whether building a preset from scratch or tweaking a complex rig, the Chain View is the most direct way to visualize and shape the signal path.
In Chain View, you can:
- Add blocks by tapping the + icon on an empty slot.
- Open a block’s settings by tapping its icon.
- Reorder blocks by pressing and dragging (purple background)
- Remove blocks via long press, followed by selecting the trash icon.
- Select multiple blocks with a long press to enable multi-selection.
- Switch canvas pages by swiping left/right (horizontal) or up/down (vertical).
- Adjust parameters using the six physical knobs, which are automatically mapped to the block under each knob (“quickpots”).
Block Settings Screen
Tapping on a block opens its settings screen. This view presents all editable parameters of the block, with the six parameters visible. To see more parameters, swipe to the left.
- Adjust each parameter using the knob above it.
- Turn the block on/off
- Delete the block
- Swap it for another block
- More settings menu
- Redefine the Quickpot
- Save default state – defines the state the block will be loaded when added to future signal chains, when creating new presets. The Quickpot is also part of the state and thus, is also saved.
Bindings view
The Bindings View is designed to give users fast access to the most important parameters in a preset. It’s where you decide which controls should be available during performance—for example, adjusting delay feedback or amp gain on the fly. This view helps bridge the gap between sound design and live interaction.
It also encourages a practical mindset while building presets: “What will I want to tweak in real time?” Once bindings are in place, they become accessible through the physical knobs or footswitches depending on the current mode. The foot bar remains visible in this view, showing the current footswitch actions based on the active mode.
- Add bindings by tapping the + on any empty slot.
- Configure bindings by tapping on them. This opens the binding settings screen, where you can select the parameter to bind, adjust value ranges, and set defaults.
- Control knob bindings directly:
- Turn a knob to adjust its bound parameter.
- Press a knob to reset the parameter to its default value.
- Tap on a footswitch slot to interact with the foot area (behavior varies by mode):
- In Preset Mode: rename the preset.
- In Stomp Mode: assign a new foot binding (if empty) or configure an existing one.
- In Scene Mode: rename the scene.
- Reorder bindings by dragging them. Works for both knob and foot areas.
- Multi-select bindings by long pressing a slot (available for knob bindings and for foot bindings in Stomp Mode).
- Once selected, you can:
- Tap Rename (only if one item is selected).
- Tap Swap (only if one item is selected).
- Tap Delete to remove the binding.
- Once selected, you can:
- Tap the preset name at the top of the screen to open the Preset Manager.
Name view
Name View provides a clean, no-distractions interface for live use. It displays the active preset name in a large, easily readable font, along with the footswitch assignments for the current mode. This view is focused on clarity and legibility on stage, especially under low-light or high-pressure conditions.
- Tap on the preset name (large font) to open the Preset Manager.
- Drag to reorder presets (in Preset Mode), foot bindings (in Stomp Mode), or scenes (in Scene Mode).
- Tap on a footswitch slot to interact with it:
- In Preset Mode: rename the preset.
- In Stomp Mode: set up a binding (if empty) or configure an existing one.
- In Scene Mode: rename the scene.
Note: The knobs do not have any function in this view.
This view is best used when you’re performing and want immediate visual confirmation of where you are and what each footswitch does—without the distraction of signal chain details or parameter controls.
Binding settings
The Binding Settings screen allows users to configure an existing binding. This is where you fine-tune how a physical control—like a knob, footswitch, or expression pedal—interacts with parameters in the preset. It also gives access to macro binding features, allowing advanced multi-parameter control setups.
How do we reach this screen?
Bindings in Anagram fall into four categories: knob bindings, foot bindings, expression bindings, and quickpot bindings.
-
For knob, foot, and expression bindings: tap on the visible binding on screen to open its settings.
-
For the expression pedal: from the homescreen, tap the more settings button, then select Configure Expression.
-
For quickpot bindings: while in a block’s settings screen, tap more settings, then choose Configure Quickpot.
Adjust binding behavior
-
Set range: Define the min and max values for the bound parameter.
-
Set start value (default) or off-value (for foot bindings and toggle-type parameters).
-
Set end value (default) or on-value (for foot bindings and toggle-type parameters).
Create macro bindings
Macros let you bind multiple parameters to a single control.
-
Option 1: Swipe to an empty page in Binding Settings, tap
+to start the binding flow. -
Option 2: Tap the
+in the top bar on an empty binding settings page.
Change existing binding
-
Option 1: Swap All
Tap the swap button in the top bar → (if macro, optionally select swap all bindings) → starts new binding flow. -
Option 2: Swap Only Current Page
Tap the swap button in the top bar → (if macro, optionally select swap current page) → starts new binding flow,
or tap the bound parameter indicator widget to restart the binding flow directly.
Remove binding
-
Option 1: Remove All
Tap the delete button in the top bar (popup opens) → (if macro, optionally tap delete all bindings) → confirm delete. -
Option 2: Remove Only Current Page
Tap the delete button in the top bar (popup opens) → (if macro, optionally tap delete current page) → confirm delete.
Rename binding
Tap the rename button next to the binding name to start the rename flow.
Notes on Macros
-
For foot bindings: macros can include any combination of parameter types.
-
For knob bindings:
-
Macros with multiple parameter types are only allowed for float + int.
-
Macros with multiple toggles are supported.
-
Macros with multiple list-type parameters are not allowed.
-
Preset manager
The Preset Manager provides a fast and organized way to browse, manage, and access all presets stored on the device. Whether you’re navigating between setups or organizing your library, this screen centralizes all preset-related actions.
Tap the area selector in the top bar to toggle between the User and Factory areas.
• The User area contains your editable presets.
• The Factory area contains factory-provided presets and cannot be edited directly.
Save preset: Tap the Save icon in the top bar to save the currently loaded preset.
Navigate: Swipe horizontally or vertically to scroll through available banks and slots.
Swap presets: Drag one preset on top of another to swap their positions.
Load preset: Tap on any slot containing a preset to load it.
Create new preset (User area only): Tap on an empty slot (+) to create a new preset.
Multi-select: Long press a preset slot to enter multi-selection mode. Once active:
Tap the X button to clear the selection.
Delete (User area only): Tap the Trash icon in the top bar.
Copy (User area only): Tap the Copy icon. You’ll be prompted to choose a destination for the pasted preset(s).
Copy to User Area (Factory area only): Tap the Copy to User Area button. The selected presets will be copied and you’ll be prompted to select a target location in the User area.
The Preset Manager is designed to keep your workflow smooth—whether you’re performing, practicing, or setting up presets ahead of time.
Dedicated functions
Tuner & Tempo
The tuner and global tempo functions are grouped into a dedicated screen, optimized for quick access during live performance or rehearsal.
Accessing the Tuner/Tempo Screen
Press and hold Footswitch A to open the Tuner/Tempo screen from any view or mode.
Tuner
The tuner is always active while the screen is open. It features a clear and responsive display, making it easy to use on stage.
Reference frequency: Use the leftmost knob to adjust the reference pitch from 420 Hz to 460 Hz.
(Default: 440 Hz)
Tempo
The global tempo affects delay blocks that are tempo-synced.
Tempo control: Use the rightmost knob to adjust the BPM between 40 and 300 BPM.
(Default: 120 BPM)
Tap Tempo: Tap Footswitch C repeatedly while the Tuner/Tempo screen is open to set the tempo manually.
Looper
Anagram includes a built-in looper for layering, practice, and creative exploration. It’s designed to be quick to access and intuitive to operate, without interrupting your flow.
Accessing the Looper
Press and hold Footswitch B to open the Looper screen from any view or mode.
Footswitch Controls
- Footswitch A: Play / Stop. Hold to Clear All
- Footswitch B: Record / Overdub. Hold to Exit the Looper
- Footswitch C: Undo. Hold to Redo
Clear visual feedback on the screen indicates the looper’s current state and action in real time.
Knob Functions
- Leftmost knob: Sets the looper position — either Input (before the signal chain) or Output (after the signal chain).
- Rightmost knob: Controls loop playback volume.
Behavior
The looper operates independently of the preset system and you can switch presets without interrupting playback. However, loops are stored in RAM only and will be lost if the device is rebooted. If you exit the Looper screen while recording, the recording will be stopped automatically.
Mixer & Global EQ
Mixer
The Mixer allows you to control the output levels of all physical outputs, including line outs, XLRs, headphones, and the overall master level.
Accessing the Mixer: Press and hold the rightmost knob (Knob 6) to open the Mixer screen from any view or mode.
Controls
The Mixer displays six vertical sliders, from left to right:
- Out 3 / L
- Out 4 / R
- Out 1 / L (XLR)
- Out 2 / R (XLR)
- Headphones
- Master Output
Each slider is controlled by the rotary knob directly above it. Adjustments persist across presets.
Sliders 1 to 5 have a level meter for monitoring the level at the controlled output.
Additional functions:
Master Link: Each output slider (1–5) has a “Master” button. When enabled, the output is affected by the Master section (6).
Stereo Link: Out 1/2 (XLR) and Out 3/4 (Line) each have a “Link” button that links their levels for stereo control. When linked, both outputs respond to either knob.
Mute: The Master slider (6) includes a Mute button, which instantly silences all linked outputs without affecting their set levels.
This makes the Mixer especially useful for stage and studio environments where you need to control multiple outputs independently—or globally—at a moment’s notice.
Global EQ
The Global EQ is a six-band equalizer applied at the end of the signal path. It allows you to shape the overall output tone of the Anagram to better fit different instruments, monitoring setups, or room acoustics. It is independent of presets and affects all outputs equally.
By design, the Global EQ is placed at the very end of the signal chain. This means that if an output is repositioned earlier in the chain using the Output block, that specific output will bypass the Global EQ entirely.
Accessing the Global EQ
The Global EQ is the second page of the Mixer screen. You can access it by either:
Swiping from right to left on the Mixer screen, or
Tapping the EQ icon in the top-right corner.
Controls and Operation
The EQ has three editable parameters per band:
- Gain
- Frequency
- Width (Q)
Use the selector in the upper-left corner to choose which parameter to control:
• Gain (Green)
• Frequency (Purple)
• Width (Brown)
Once a mode is selected, the six rotary knobs control the chosen parameter across all six bands.
A Reset button in the top-right corner resets the EQ to a flat state.
A Real-Time Analyzer (RTA) is displayed in the background, providing visual feedback of the output signal to assist with EQ decisions during rehearsal or performance.
The Global EQ is ideal for final tonal adjustments and remains active across all presets.
Blocks
Blocks are the core building units of every preset in Anagram. Each block represents a specific DSP function—such as an amplifier, cabinet, effect, or utility—and can be freely placed and configured within the signal chain.
- Blocks are organized into categories for easier navigation and setup:
- Amps & Cabs: Amplifier models and cabinet simulators.
- Overdrive & Distortion: Saturation, fuzz, and clipping tools.
- EQs, Filters & Dynamics: Equalizers, compressors, and noise control.
- Modulation & Pitch: Chorus, flanger, octave, and pitch effects.
- Delay & Reverb: Time-based spatial effects.
- Utilities: General-purpose blocks including gain control, split/merge routing, output assignment, and integration with external gear (Send, Return, FX Loop).
Each block can be individually configured and repositioned. New blocks are added over time through firmware updates, and Anagram’s architecture is built to support future third-party blocks as well.
File/Asset loaders
Some blocks in Anagram allow you to load external files, such as neural models and cabinet impulse responses. These blocks extend the sonic possibilities of the device by letting you incorporate third-party or user-generated content.
All files are managed and transferred to Anagram using the Darkglass Suite desktop application.
Neural Blocks
Anagram supports NAM and AIDA-X neural models through three dedicated blocks:
- Neural Amp: Designed to replicate full amplifier behavior. Includes a built-in Amp EQ section with low, low-mid, high-mid and treble controls. The EQ can be positioned before or after the neural model.
- Neural Pedal: Intended for modeling preamps or distortion pedals. Includes a Blend control to mix the processed signal with the dry input.
- Neural Loader: A general-purpose model loader with no additional controls beyond gain and model selection.
All three neural blocks share these core parameters:
- Input Gain
- Output Gain
- Model Selector
When importing files using the Suite, users can classify their neural models as Amps, Pedals or Miscellaneous in order to have them loaded by the correct block.
Cabinet Loader
The Cabinet Loader block allows you to load and use cabinet impulse responses (IRs) to shape the final tone of your signal. It includes:
- Cabinet Selector
- Blend: Controls the mix between the IR and the dry signal.
- Level: Sets the output volume of the block.
These file-based blocks are essential for players who want to tailor their tone using high-quality external captures or custom IR libraries.
System blocks
System blocks are utility elements used to control signal routing and integration within the chain. They don’t affect the sound directly, but they define how audio flows through the system.
Output
The Output block defines where the signal leaves the virtual chain and maps it to a physical output on the device. It allows you to:
- Route the signal to a specific pair of outputs (Out 1/2 or Out 3/4).
- Insert the output at any point in the chain—not just at the end.
Any output routed via an Output block bypasses the Global EQ, since the EQ is applied only at the end of the signal path.
Multiple Output blocks can be used in the same chain to create complex routing schemes (e.g., sending parallel signals to different amps or systems).
Split & Merge
Split
The Split block is used to divide the signal between Row 1 and Row 2, enabling parallel processing paths.
- Level Control: You can adjust the individual level sent to each row.
- Crossover Function:
- Off: Full signal is sent to both rows (no frequency filtering).
- 1 Lo / 2 Hi: Sends low frequencies to Row 1 and highs to Row 2.
- 1 Hi / 2 Lo: Sends highs to Row 1 and lows to Row 2.
- A crossover frequency control allows you to set the split point.
This block is ideal for creating parallel chains with frequency-based separation or simply splitting the signal for dual processing.
Merge
The Merge block is used to bring together the two processing rows into a single signal path.
- Blend: Adjusts the balance between the signals coming from Row 1 and Row 2.
- Output Level: Controls the final output gain of the merged signal.
Merge blocks allow you to dial in the mix between parallel paths precisely, making them essential for tone layering or wet/dry setups.
Both Split and Merge blocks handle stereo and mono automatically.
Send, Return & FX Loop
These blocks allow you to integrate external gear—such as pedals, multi-effects, or processors—into your Anagram signal chain. They provide flexible routing options and precise control over signal flow.
Anagram’s Send and Return jacks are stereo capable. You can set them to Mono or Stereo independently via the Device Settings menu.
Send Block
The Send block routes part of your signal out of the Anagram via the Send jack.
Controls:
- Send Level: Adjusts the signal level being sent out.
- Through Level: Sets the level of the signal that continues through the internal chain after the split.
This allows for both full inserts and parallel routing setups, depending on how you balance the send and through levels.
Return Block
The Return block brings an external signal back into the chain via the Return jack.
Controls:
- Blend: Mixes the returned signal with the through signal.
- Output Level: Controls the level of the combined signal.
- Return Polarity: Choose between Normal and Inverted phase, useful for resolving phase issues in complex or analog setups.
FX Loop Block
The FX Loop block combines both Send and Return into a single unit. It is designed for inserting external gear as an inline effect loop.
Controls:
- Send Level: Sets the level of the signal going out.
- Blend: Controls the mix between the internal and returned signal.
- Output Level: Adjusts the final level after blending.
- Polarity: Select between Normal and Inverted return phase.
The FX Loop block simplifies routing when using single-in/single-out pedals or processors, while still giving control over signal levels and phase behaviour.
MIDI support
The MIDI implementation of Anagram is under development.
In v1.1 Anagram supports Program Change messages to switch between the presets, from 1 to 126. The Program Change number is not tied to the preset itself, but the slot the preset is in, so the same Program Change always loads the same slot on the currently active Preset Area.
In the Device settings you can change the preset numbering to “MIDI Style – (001-126)” to see the slot Program Change numbers in the Signal Chain view and in the Preset Manager. In the Device settings you can also determine the MIDI channel from omni (listen to all channels) to 1-16.
In the future, Anagram will support more sophisticated MIDI control to access different system settings, individual parameters and modes of the device.The design accommodates the addition of an external controller beside the Anagram, enabling access to both the Anagram’s interface functions and a broader range of controls, so that the unit can be controlled by a computer and/or a footswitch for seamless live performance needs and ease of use.
Technical Specifications
Instrument Input
- Connector: ¼” TS
- Impedance: 1 MΩ
- Max Input Level: +12 dBu
Send
- Connector: ¼” TRS
- Impedance: 100 Ω
- Max Output Level: +12 dBu
Return
- Connector: ¼” TRS
- Impedance: 1 MΩ
- Max Input Level: +12 dBu
Headphones Output
- Connector: 3.5 mm TRS
- Three-stage gain control
Output 1/L-2/R
- Connector: 2x XLR
- Digitally controlled ground lift
- Impedance: 100 Ω
- Max Output Level: +2.2 dBu
Output 3L-4/R
- Connector: ¼” TS
- Impedance: 100 Ω
- Max Output Level: +12 dBu
MIDI In-Out
- Input Connector: 3.5 mm TRS (Type A)
- Output Connector: 3.5 mm TRS (Type A)
USB-C
- Format: USB Audio Class 2.0 Compliant
- Channels: 7 (4in/3out)
- Audio Clock: 48 kHz (Fixed)
Dimensions
- Width: 210 mm / 8.27”
- Length: 105 mm / 4.13”
- Height: 62 mm / 2.44”
- Weight: 815 g / 1.8 lbs
Warning
- No user-serviceable parts inside the device. Do not open the pedal.
- Never use the device in a high humidity environment or near liquids.
- Anagram comes with a 2-year limited warranty covering manufacturing defects. If you experience any issues with your pedal, please contact support@darkglass.com to obtain a Return Authorization Number or to find out about the nearest authorized repair center.
Warranty
Please register for your warranty at http://mypedal.darkglass.com. Anagram is under warranty to the original owner for a period of two years against manufacturing defects in the country where the product was originally purchased.
If you experience a problem with the unit, please contact support@darkglass.com to receive a Return Authorization number or for information on the nearest authorized repair center. A copy of your original receipt must be included with all warranty repairs. You are responsible for all shipping charges. The unit must be shipped to us freight prepaid. We will return the unit freight collect. Darkglass Electronics Oy is not responsible for shipping damage either to or from our service center. Claims must be filed with the carrier.
For repairs please contact your local dealer or distributor for your country’s specific warranty period and repair procedures. Darkglass®, Microtubes®, and Microtubes Engine are registered trademarks of Darkglass Electronics OY.